Wednesday, 29 February 2012

Entryway Bench Part 5 - Cutting Corners

This week is all about corners.  First we'll look at where the storage bottom shelf will rest in the legs.  The options were to cut out the shape of the legs in the corners of the shelf or to cut out the shape of the shelf in the legs.  In order to make it a little easier  I opted to do ...both?

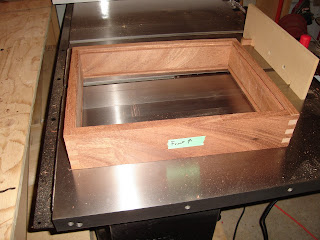
It's a little hard to see here but the dado the drawer bottom is going to fit into is cut across the leg at a 45 degree angle. 

Here I do some dry fitting and measure the actual length that the storage bottom needs to be.
And here I do the same thing to get the actual width.  I waited until the build was at this point to do the measuring instead of relying on the measurements from my SketchUp drawing just in case some of the dimensions were changed along the way.  I was a little surprised to find the dimensions turned out exactly the same!
The MDF storage bottom is cut to size on the table saw and the corners are cut off Battlestar Galactica style.
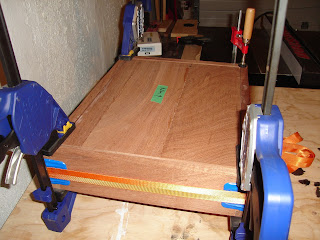
The storage bottom fits like a glove.  Notice the broken figure where one of the longer side pieces got away from me during assembly.
This feels like an appropriate place to stop for now.  Cheers!

Monday, 27 February 2012

The Colbert Report covers SawStop

All of the popular woodworking sites only link to the Comedy Central site and Canadians can't watch this video.  This is the link to a network that broadcast the video in Canada.

http://www.thecomedynetwork.ca/Shows/TheColbertReport?videoPackage=105032

The SawStop clip starts around 5:45.

Cheers!

Wednesday, 22 February 2012

Entryway Bench - Part 4

So we're finally getting back to the bench.  The projects that are for yourself are always second priority aren't they?

At the end of part three we had the right and left sides of the bench dry fit together.  Now it's time for the front and back.  Not much to see here.  The front and back pieces were cut to size and the tenons were cut in the ends.  A groove was cut into the front and side pieces to hold the bottom piece which will be made out of 1/2" MDF.  The real perk this week is that the bench is starting to look like a bench!

Front, back and sides with tenons and a groove cut for the bottom.

The Back

The Front

Here I added the templates I cut earlier to get a feel for how the curved pieces will look.

Wednesday, 15 February 2012

The Big Finish (Memory Box pt6)

The finish came out almost as smooth as glass.  Boiled Linseed Oil went down first, then layers of shellac, four on the sides and five on the top.  The last layer of shellac went on around 9am the same day the box was being gifted.


The gift went over extremely well and definitely generated some conversation at the engagement party.
You can't put a price on something made for close friends but given the hours that went into this project vs. what I make at my day job, plus materials, this box is worth approximately $1100.  My wife is quick to point out that $1100 doesn't include the overhead of the thousands of dollars of tools she's purchased for me to make this possible.  The look on our friends faces when they get a one of a kind gift like this makes it all very worth it.

-Quote: "Now can you finish MY bench?" - Attributed to Mrs. G

Cheers!


Wednesday, 8 February 2012

The memory box is creating it's own memories (Memory Box pt5)

The box is looking so good at this point I can't help but be proud of it. I just wish I had better lighting and a better camera so I could convey how good this thing looks in person.
Glued and clamped


The box joints are sanded flush and the outside is sanded to 220 grit.


All four sides are run though the table saw to detach the lid.


Preparing to make cutout for the hinges.

Hinges are added into rabbits so the lid will fit flush.


Wednesday, 1 February 2012

All Tops and Bottoms (Memory Box pt3)

The top and bottom panels of the box are very simple.  The design is meant to highlight the wood grain. In this case we tried to let nature show a timeline starting at the left and growing to the right.


Now that I've made this post I see that I might have reversed one of the boards on the bottom panel.  I use the chalk  triangles to make sure they go on in the right direction and order.  I use the letters I and O for inside and outside and the letter F with an arrow to denote the Front of the project.  These notes start out in chalk on the project and are later put onto green painters tape as the project progresses.


And In This Corner! (Memory Box pt4)

Two jabs and and uppercut later...a box jointing jig is victorious in a TKO fight against hand cut dovetails.

This project is very angular and box joints felt like the right design choice.  They are very strong, provide some visual interest with the contrast of the end grain and long grain wood, plus they're easy to make with a simple jig.

I'm sorry I didn't take more pictures of the jig in use because it's so simple to use but now I realize, hard to explain.

This will do a better job than any wall of text I could possibly put here.  Just keep hitting the 'Next' button button.  Box Jointing Jig.


Now that the sides are done, exact measurements can be taken to cut the top and bottom to the right size.
After being cut to size rabbits are cut around the edges of the panels to fit snugly into the grooves.
Now the sanding will commence!  The inside surfaces of the box are sanded down to 220 grit now while they are easily accessible.

Next post should be dry fitting and glue up.  Cheers!